Once upon a time I had a hot mess of network gear, a tangle of cables running in every direction, and no idea whatsoever on how to organize it all. Needless to say this was not something I was going to put on display. Over the years I kept looking at the mess, knowing that I could do better. So I did what anyone with access to internet might do. I went online in search of a great idea! Surely someone had already figured this out and shared their creative idea with the world. But after hitting all the obvious places I had to take a break. There was nothing remotely close for what I wanted to do. After some thought, about what small businesses do, I decided to blend a typical comm closet with an approach that would work in a home lab/enthusiast setting. This is the project that was born from that process, and I’m quite proud of the end result.
Planning
The first step in this process was to pick a location where I could centralize my networking gear. This location would need to be concealed, accessible, and fairly central to the remainder of the house. If you plan on locating your WiFi access point in this location consider a higher point (2nd floor), and avoid locations that would shield the radio waves from reaching the remainder of the house. In my example, I planned for this when I was building my house. I used a bedroom closet that was central to my home and pre-wired my house with bulk cable (2x Cat5e, 2x RG6). When I was finished running all the cable drops around the house, I had about 22 Ethernet cables and 22 coax cables I would need to deal with in an organized manor. Everyone’s situation will be different here.
Layout
 Now you need to determine where to install each cable drop throughout your house. It definitely helps to create an outline of your house, and use that to detail your final placement of the drops. One method that worked for me was to walk through your home and envision different furniture configurations and where you might locate a computer desk. In addition to that you should consider the IoT (Internet of Things) revolution. Everything is moving to the cloud and becoming internet-enabled. So consider these things too. Not everything is going to be wireless, and wireless is not a guarantee of bandwidth either. Another thing to consider is the pathway through a bedroom. If a pathway segments the room in two consider placing a drop on each side of the pathway so you don’t have to run a cable across a doorway. Lastly, don’t forget the entertainment area in the living room or family room! Shoo, that was a close one!
Measure
Measure twice, cut once! Assuming your drawing isn’t to scale, and you used crayons like I did, you will have to roughly measure the distance of each run. Take obstacles into consideration as everything will not be a straight shot. Account for vertical runs up or down a wall too. Even after all that planning you will still run into unforeseen obstacles and barriers. If you are just running CategoryX cable, double your total estimate then add 1/3 more. For example, if your plan calls for 100 ft, you would end up with 266 ft of copper Ethernet cable.
Supplies
Time to gather all the tools and items you will need for your network closet install. You will need additional tools and supplies if you plan on running drops pre/post construction.
Suggested Items:
- Rack Related
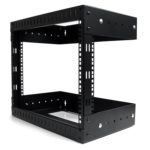
- Wall Mount Rack (Adjustable Depth)
- 3.5 – 4″ Lag Bolts
- Cat6 Patch Panel / Cat5e Patch Panel
- Rack Mount Shelf (1U Shelf, 2U Shelf)
- Horizontal Cable Manager
- Uninterruptible Power Supply (Wall Mount)
- Helpful Tools
- Cable Drop Install Tools
- Cable Drop Items
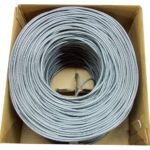
- Bulk Cable (CatX, RG6)
- Cat5e / Cat6 Cable
- Keystone Face Plates
- Keystone Jacks
- Low Voltage Electrical Box (Pre-Construction / Post Construction)


Cable Management
 Use your cable toner to trace each drop to the location where it terminates in your network closet. Use the cable labels to identify each cable. Do this at the drop location and your rack. Consider the label placement since you may have to trim your cables back due to the length.
Rack Install
 Clear the central area, that will serve as your network closet, of all items. If you are running drops clear those areas too. Decide where your media cables will exit the wall in your network closet. I suggest to the left or right of where you are going to mount your equipment rack. As there will be limited room behind the rack itself, and you will want the cables to be accessible down the road. See my walk-through video at the end of this article for examples. In my install I used a PVC pipe passed through to the attic. This will allow for future cable runs if I need to add on down the road. Install your individual drops if they don’t already exist. There will be a future article on this topic. Now it’s time to mount your equipment rack. It is important that the rack be mounted directly to in-wall studs. Ensure your studs align to the rack dimensions before you start. Use your stud finder to map out the studs. If not, you will need to make some stud adjustments. I needed to add an additional stud to properly align the rack where I wanted to mount it. This step is necessary and important to properly support your expensive home area network gear.
Patch Panel Install
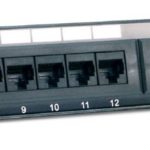 Once your rack is mounted, route the Ethernet cable behind the open rack. Ensure your cables are already labeled at this point. Retrieve your patch panel and decide how to order your cables. Use your wire-stripper and punch-down tool to attach the cables. Use the EIA 568-B standard for this procedure. It’s important to use the same standard at each end of the drop. The keystone jacks will work in the same manor as the patch panel when it comes to attaching the cable. Now you are ready to mount your patch panel to the rack. Time for a quick break and a beer so you can admire the birth of a proper home area network (HAN). Give yourself a pat on the back. The hard part is over.
Rack Options
 Here are some options to consider for your newly installed network closet rack. Use rack shelves to accommodate non-rack mounted hardware. This will give you the best of both worlds. It makes transition to rack-mounted gear easier too. Consider a horizontal cable manager for a finished look and really clean cable management. You might try a horizontal Power Distribution Unit (PDU) for surge protection, and simplified power supply to your gear. In addition or in lieu of a PDU, I highly recommend using a small Uninterruptible Power Supply (UPS) to protect your equipment and avoid hiccups during power blips or extended outages.
Summary
With the proper planning and careful installation your network closet build will last a long time. Since you are using an industry standard rack, that will allow older equipment to be easily replaced with newer and faster gear when the day comes. There are many other side benefits for this type of implementation too. Keeping your gear consolidated and organized allows you to protect it easier and troubleshoot issues faster. I could not be happier with my setup. I only wished I had found an example years earlier. See how my install turned out by watching the video below.