Introduction
Lesser known of Iometer comes in the form of it’s network bandwidth testing functionality. Iometer excels beautifully at testing all facets of disk storage IO and this article is going to explain how you can leverage it for different networking scenarios. Some of these scenarios might be a simple upload or download bandwidth test from host A to B, while another test might be to check single session bandwidth on an aggregate (port channel) link. Iometer even allows us to check our loopback bandwidth which is a good indicator of your bus speed. You can even build your test scenario to account for your CPU, which is certainly a factor in handling thousands of small packets on a fast link when your NIC (Network Interface Card) is missing TOE (TCP Offload Engine).
Basic Requirements
First you will need Iometer installed on every host you intended to be involved in the testing. Install Iometer on all hosts. Optional: Create a file share on the host where you intend to run Iometer from. For example your management host. Iometer does not have to be installed on a host involved in the testing. For example you can manage testing from HOST-A while you test the connection between HOST-B and HOST-C. I will refer to the controlling instance of Iometer as the Iometer Manager. HOST-B and HOST-C would only require the dynamo.exe process running to implement this scenario. The file share is used to maintain a single copy of Iometer’s configuration file that defines different packet scenarios. That avoids recreating the same scenario every time you run a different instance of Iometer concurrently.
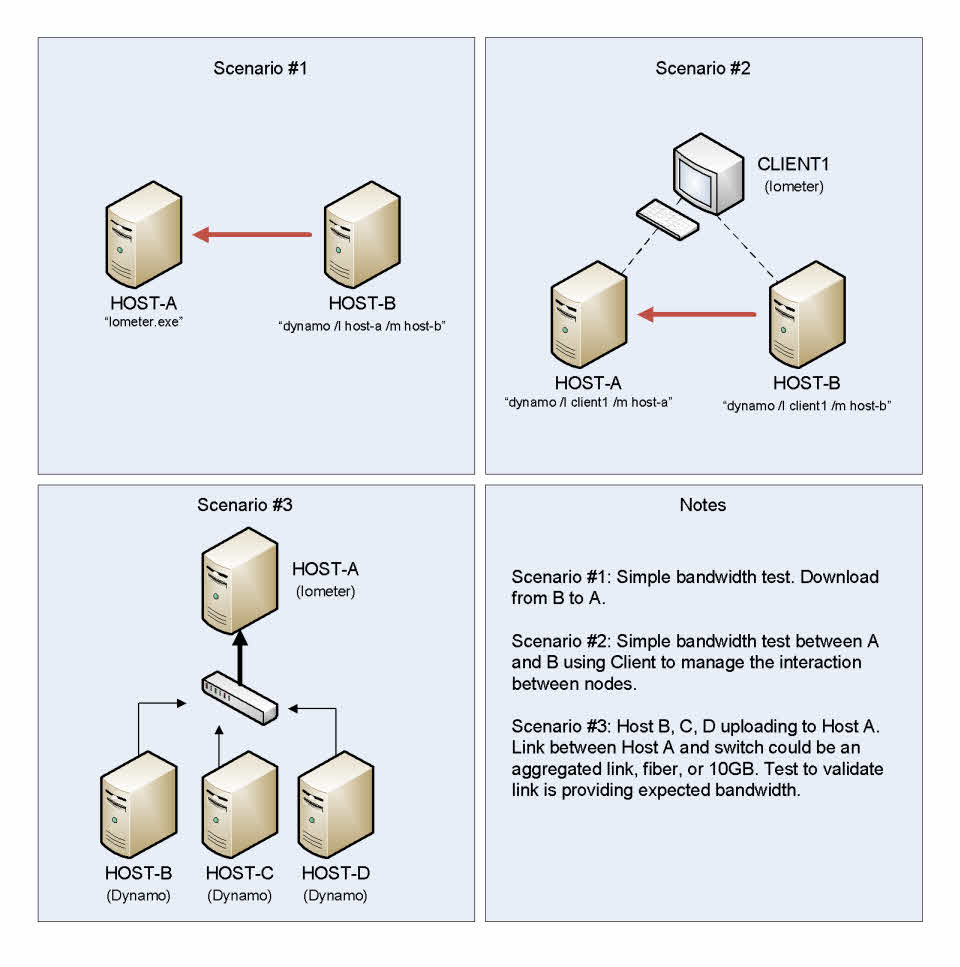
Scenario #1 – Simple Bandwidth Test (A to B)
In this scenario we are going to run the Iometer Manager (GUI) on HOST-A and test the bandwidth to HOST-B. On HOST-A start Iometer (iometer.exe). You may need to run Iometer as administrator on Vista or newer (Right-Click Iometer -> Run as administrator).

Run Iometer on HOST-A
Topology Setup
Open a command prompt on HOST-B and change directories to your Iometer install location (typically c:\program files (x86)\Iometer.org\Iometer 2006.07.27). Execute the following command:
*Note: If you are not using DNS or a Hosts file to define your clients, use IP addresses instead.
Dynamo Help describes these parameters differently, but I find it easier to understand in this way. If your Iometer Manager is not running or the client cannot communicate with the manager then you will receive an error when you try to start the dynamo. You should see HOST-B appear in the manager window under HOST-A. Expand the nodes, select each worker (Disk Worker) and click “Disconnect Selected Worker or Manager” to remove all workers from HOST-A and HOST-B.

On HOST-B execute dynamo command to establish communication with Iometer manager.
Network Targets
Next select HOST-A and click “Start a New Network Worker on Selected Manager” (Network/Pipe Icon). A new “Worker 1” instance will appear under HOST-A with a network icon next to it. Select “Worker 1”. Select “Network Targets” Tab in right window pane. In the tree view select the destination interface you wish to test. In the pull-down to the right of the tree select the originating IP/host from HOST-A. This will be the point to point test case for our scenario. If you only have one network interface on each host it will be your only option in the target and origins respectively. You should notice the Topology window pane on the very left now displays a “ghost” Worker 1 thread for HOST-B. This signifies it’s the partner to the originating Worker 1 thread on HOST-A.

Select primary worker, pick target address, and choose originating interface (address).
Access Specifications
Now we select the Access Specification Tab and define our network traffic scenario. Click the “New” button and the “Edit Access Specification” window will display. Use the following settings for this basic test:
Transfer Request Size: 16 Kilobytes
Percent of Access Specification: 100% Percent
Random/Sequential Distribution: 100% Sequential
Burstiness:
- Transfer Delay: 0 ms
- Burst Length: 1 I/Os
Align I/Os on: Sector Boundaries
Reply Size: No Reply

Select “New” button to create a new Access Specification.

Define a new access specification for network bandwidth testing.
Click Ok, and select the “Add” button while it is still highlighted. Your new Access Specification should be listed under the Assigned Access Specifications list.

Add newly created access specification to “Assigned Access Specifications”
Results Display
Now select the Results Display Tab and move the slider to “2”. This is the update frequency when the test is in progress. “1” may be too frequent and we don’t want to impact testing so “2”. Next change the “Total MBs per Second” dynamic graph item by clicking on the title and selecting Megabytes per Second -> Read Megabytes per Second. If you fail to change this indicator it will give an incorrect read out of double the actual performance you are getting.

Add title, run time, record results: none
Test Setup
Next select the Test Setup Tab and provide a description if you like (optional). This is used when saving off the test results to a file. Set “Run Time” for 20 Seconds and, Record Results to None. Leave the rest at their defaults. We are now ready to test!


Start the Test
Select the “Results Display” Tab again and Click the Green Flag button at the top. While the test is occurring you will see the blue bars adjusting the read-out and a count-down timing at the bottom left portion of the window. Once you receive “Test Completed Successfully” it is safe to resume activity on your system again. You should avoid any activity while this test is running to prevent inaccurate results. That includes any downloads/uploads applications may be performing.

Video Tutorial